Solution-Deployment
AWS Console
The following section outline the steps needed to complete deployment of our product to your environment.
Login to the AWS Console, Note: Your user account will require privileges for Lambda, DynamoDB, Amplify, and Amazon Connect.
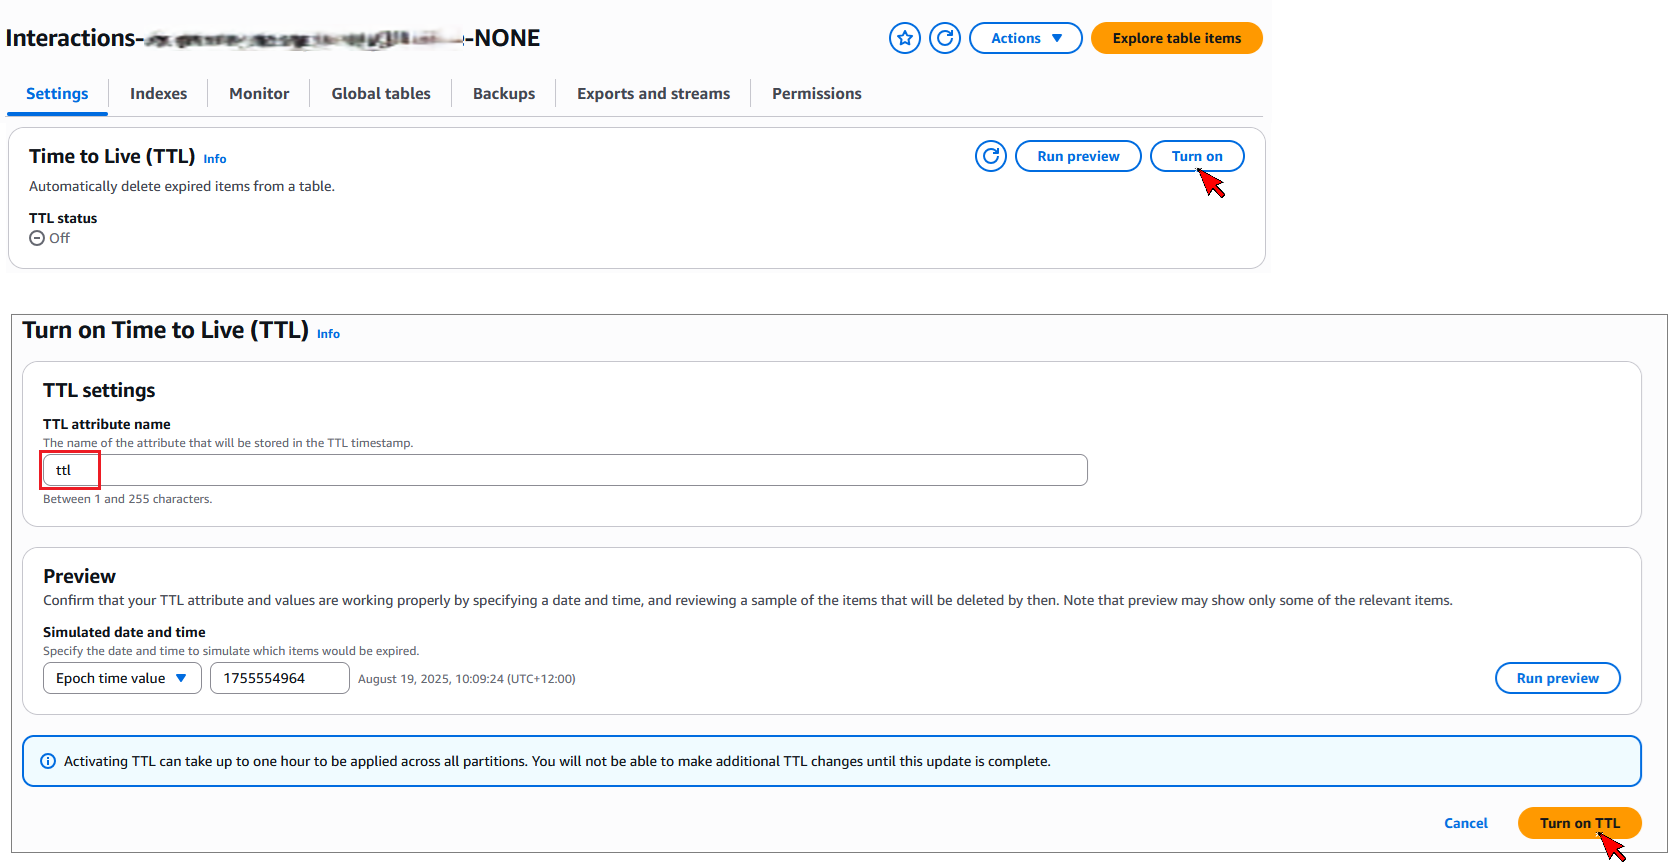
DynamoDB - Enable TTL (time to live) on the Interactions Table
1. Navigate to the DynamoDB console page
2. Select 'Tables' from the left hand menu, and locate the newly created table - named similar to "Interactions-YourAmplifyId-NONE"
3. View Table Details and navigate to 'Settings' tab
4. Scroll down to the Time to Live (TTL) section. Select 'Turn on'
5. Set TTL attribute to 'ttl', ensuring lower case is used. Then select 'Turn on TTL'
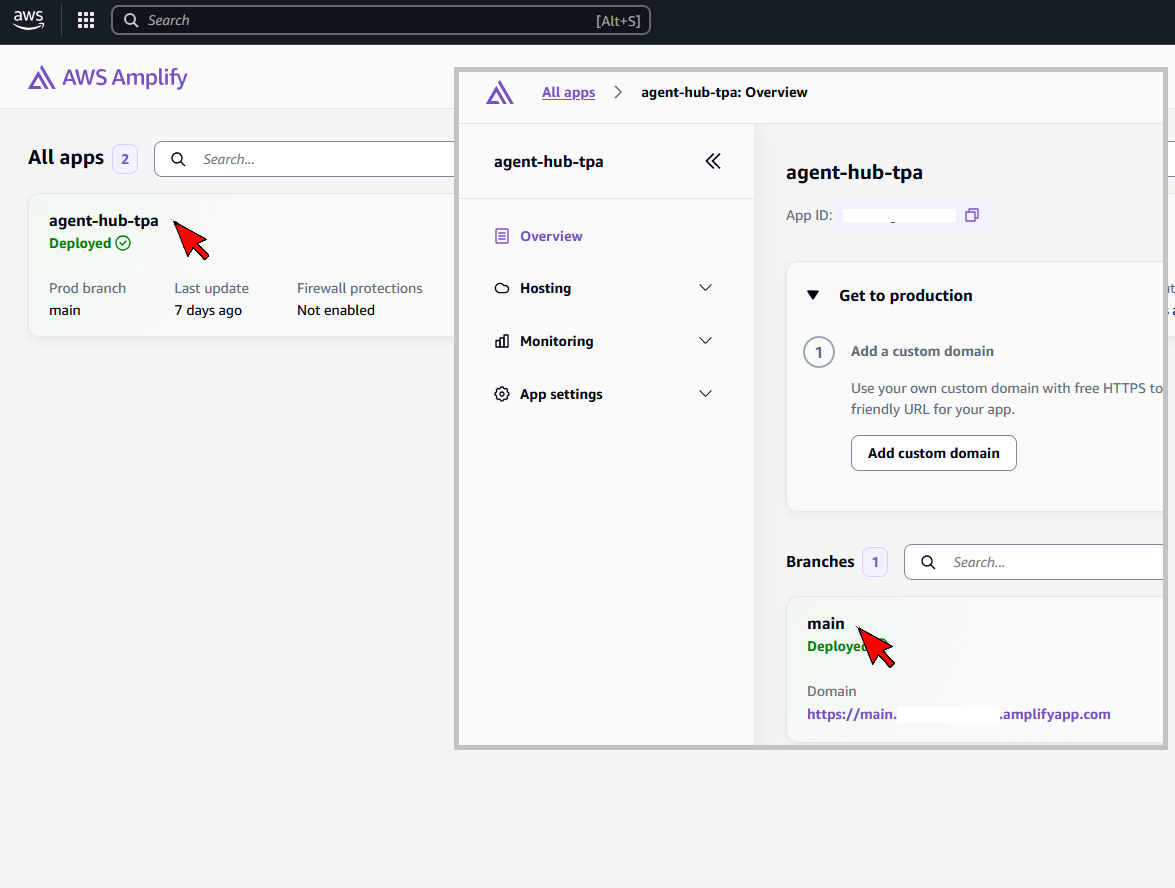
Amplify Console - Set Agent Hub Configuration
1. Navigate to the AWS Amplify console page
2. Locate and select the ‘agent-hub-tpa’ application
3. Select the ‘main’ branch which will open the application deployments
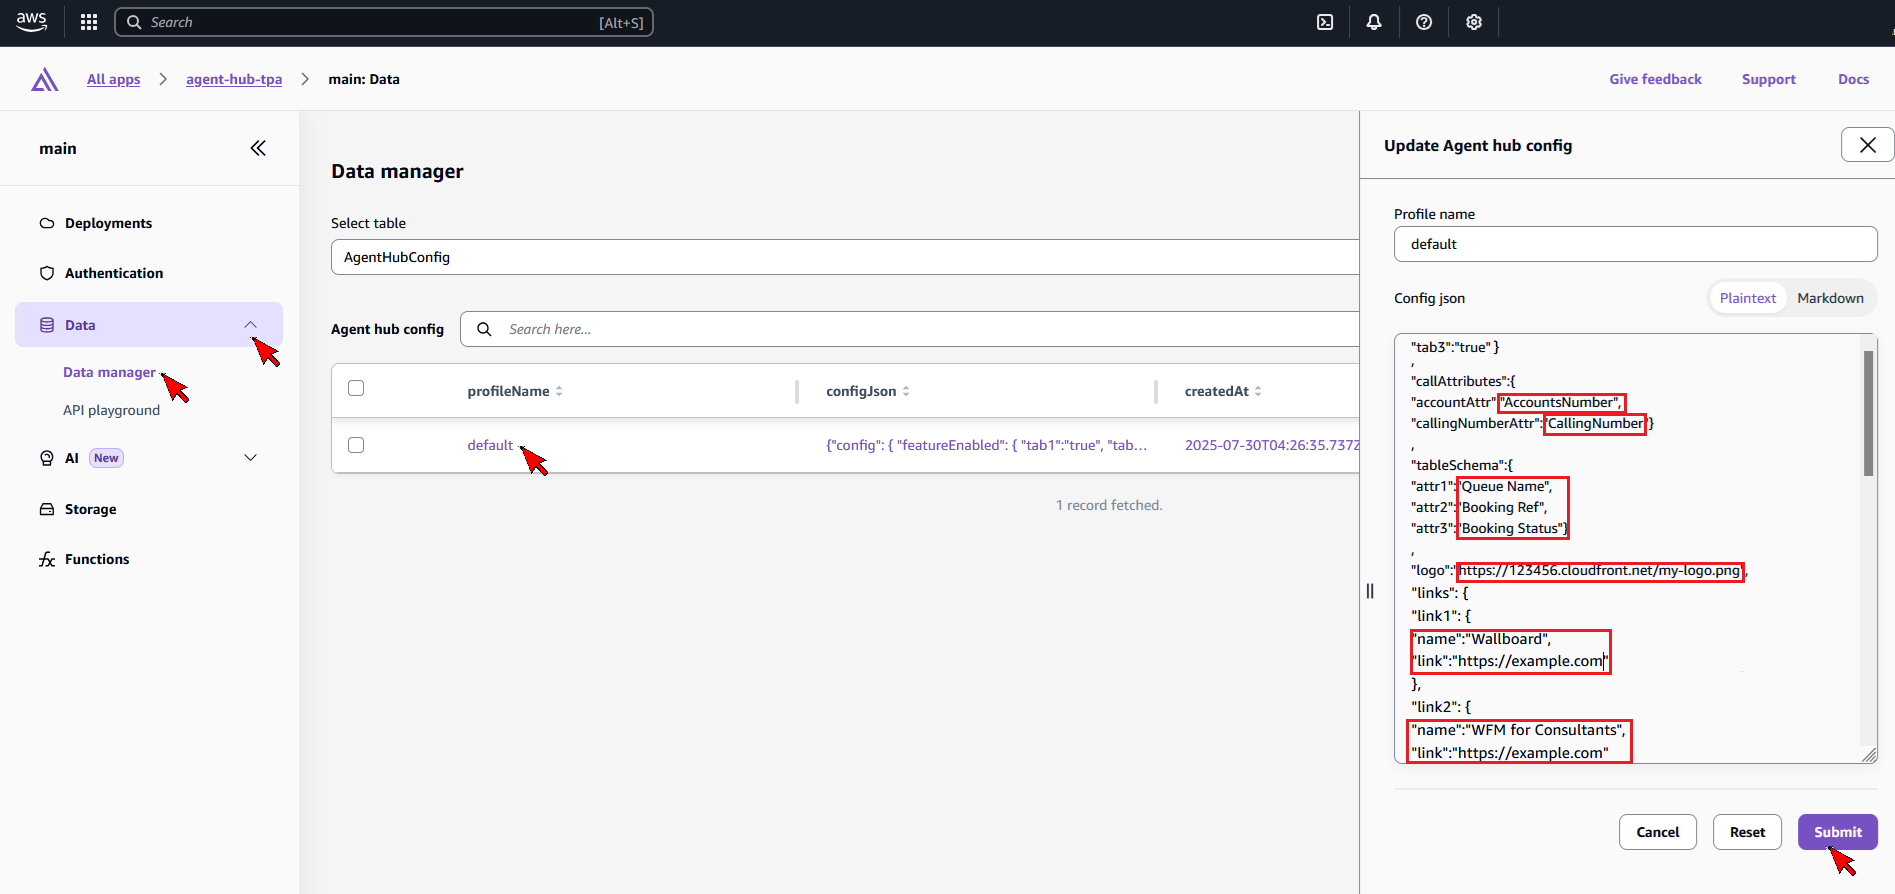
4. On the left-hand menu, expand the Data option, and select Data manager
5. Select the AgentHubConfig table, and then select the record ‘default’ to edit
6. Update the following values as applicable:
- callAttributes: accountAttr (Amazon Connect account number attribute key name) and callingNumberAttr (Amazon Connect calling number attribute key name)
- tableSchema: attr1, attr2, and attr3 (Amazon Connect custom attribute key names; recommended attr1 is queuename, and attr2 and attr3 are attributes to assist agents). These three values will be the friendly name presented to the agent in the Agent Hub contact history.
- logo: your company logo hosted publically, e.g. cloludfront distribution.
- links: for each link1-8, there is a friendly name, and link for URL. For website links, if no value is entered in the name field (e.g. link7 and link8), the link will not display.
7. Select Submit to save configuration record
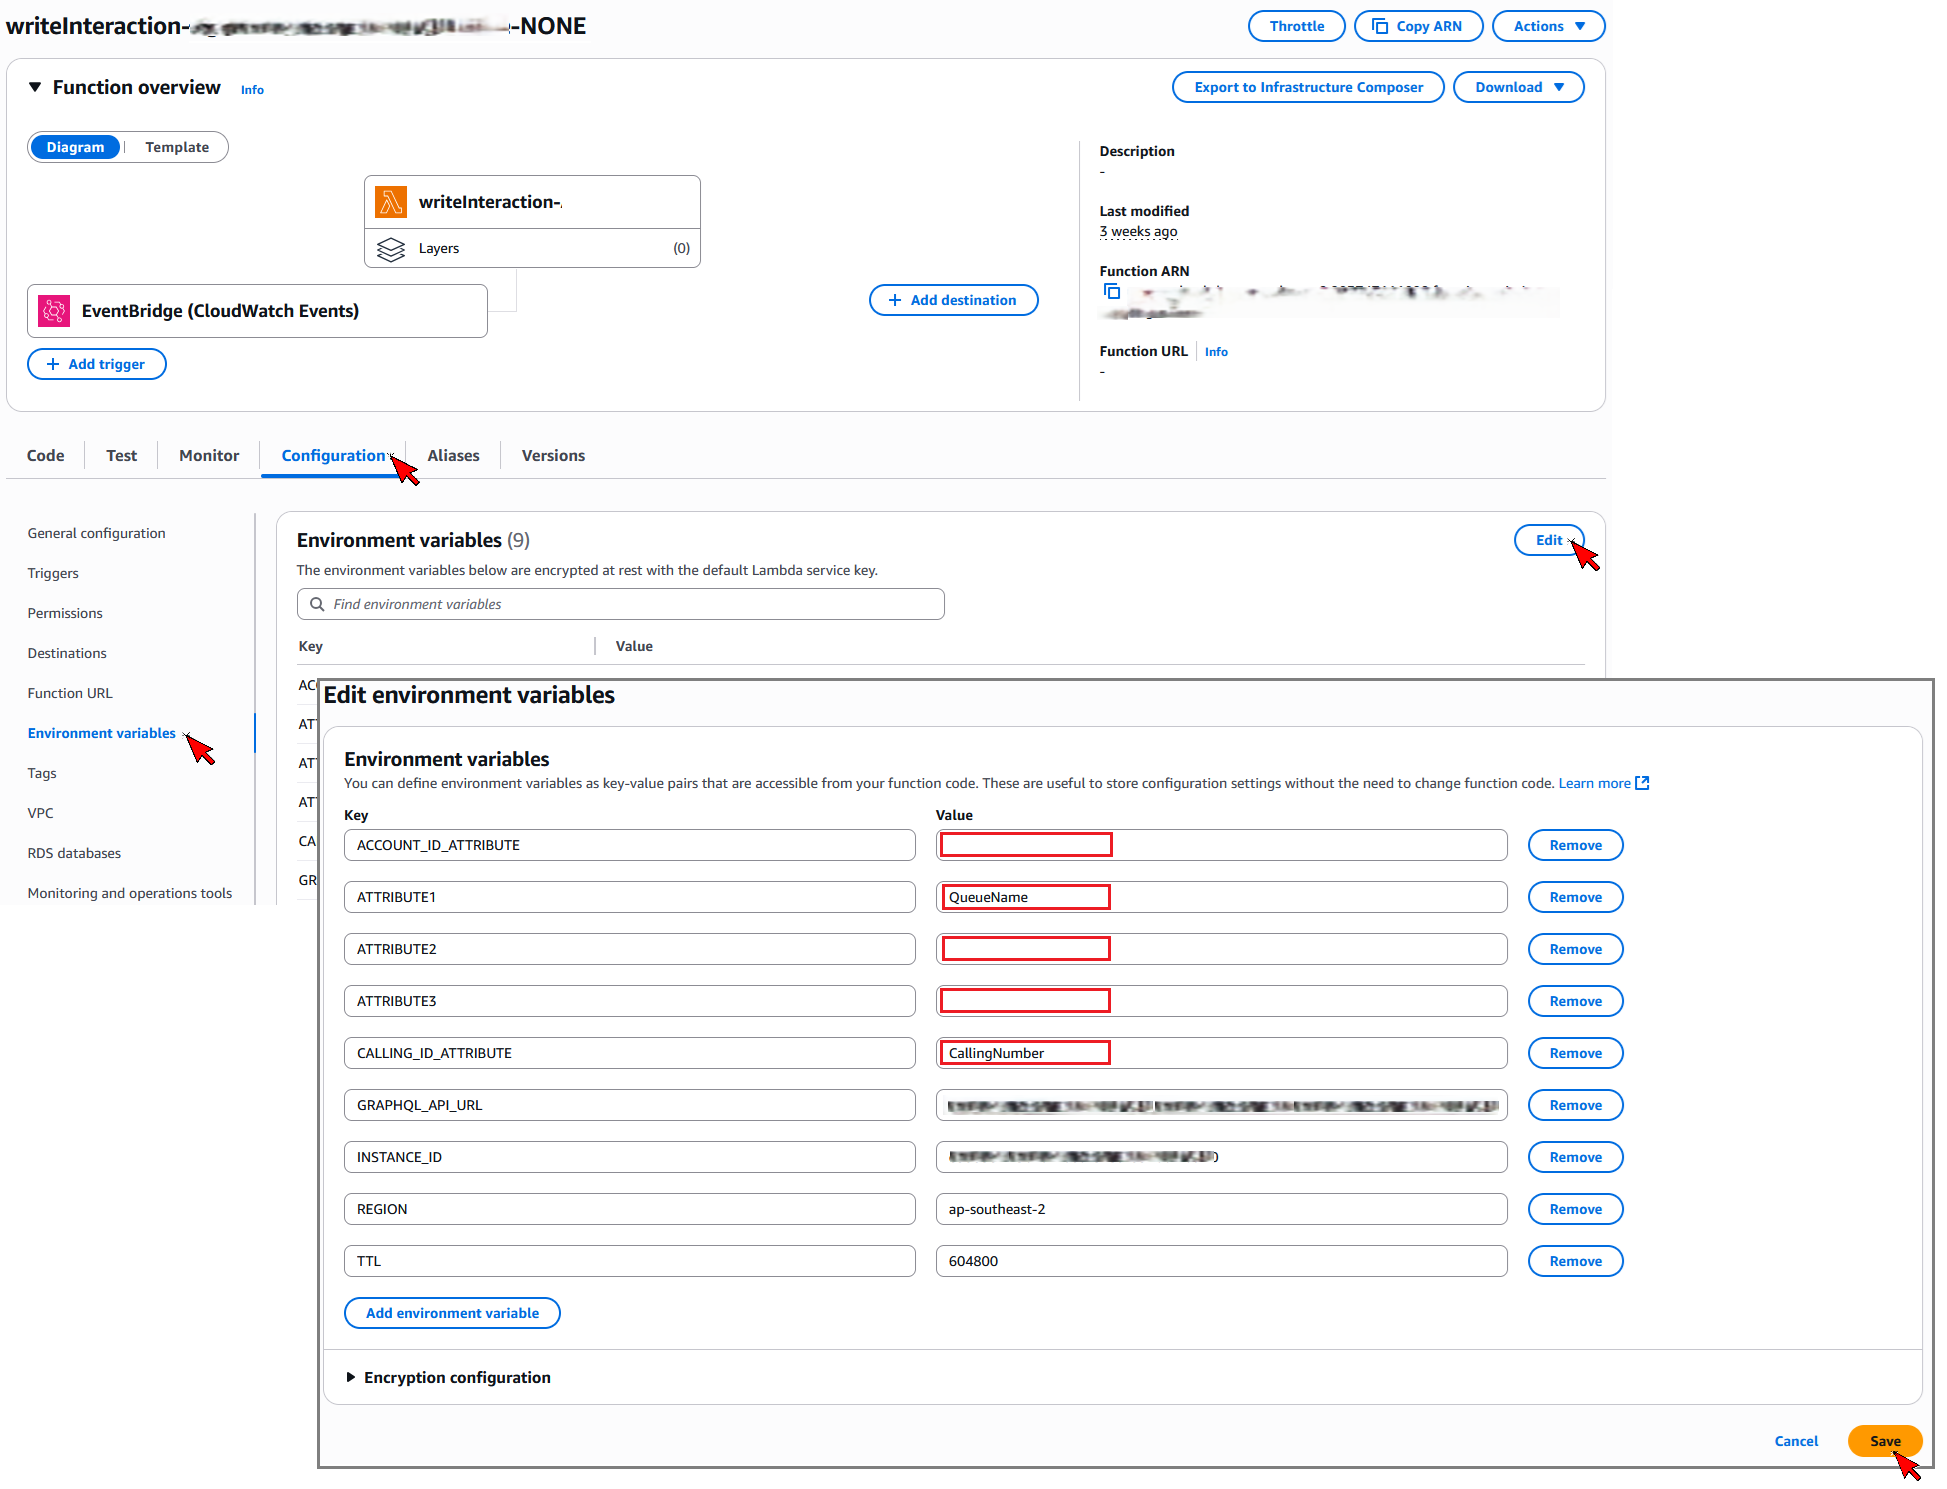
Lambda - Set custom attributes to store in the Interactions Table
1. Navigate to the AWS Lambda console page
2. Locate and select the new function – named “ccx-writeInteractions-YourConnectAlias"
3. Select the Configuration tab, and then Environment Variables menu option
4. Select Edit, and update the following
- ACCOUNT_ID_ATTRIBUTE = use the Amazon Connect custom attribute. This should match the ‘accountAttr’ used in the Agent Hub Config above
- CALLING_ID_ATTRIBUTE = use the Amazon Connect custom attribute. This should match the ‘callingNumberAttr’ used in the Agent Hub Config above
- ATTRIBUTE1 = use the Amazon Connect custom attribute, typically queue name. This should match the ‘attr1’ used in the Agent Hub Config above.
- ATTRIBUTE2 = use the Amazon Connect custom attribute, e.g. BookingNumber. This should match the ‘attr2’ used in the Agent Hub Config above
- ATTRIBUTE3 = use the Amazon Connect custom attribute, e.g. BookingStatus. This should match the ‘attr3’ used in the Agent Hub Config above
5. When complete, click save. Note, no other variables need to be changed.
Amazon Connect - Enable Third Party Applications
1. Navigate to the Amazon Connect console page
2. Navigate the to the top left menu option Third-party applications
3. Locate application "AgentHub-YourConnectAlias", and select to edit
4. Update fields
- Display name: change to preferred name to display, e.g. ‘Agent Hub’
- Iframe configuration: update the Allow object so it looks like: "Allow": ["clipboard-write","clipboard-read"]
- Instance association: select the instance required for this app to be present
5. Click Save

CloudTrail - Enable S3 Events If you do not already have a CloudTrail created in your account with S3 Data Events, then one will need to be created. This Trail is used for an EventBridge rule to trigger the Lambda function on contact record creation.
1. Navigate to the CloudTrail console page
2. Navigate the to the top left menu option Trails, then 'Create trail'
3. Complete first page as applicable. On page 2, log events, tick 'Data Events', then in the data events section, select 'S3' as the resource type, and Log all events.
4. Select Next, and then Create Trail.
Amazon Connect
Contact Flows
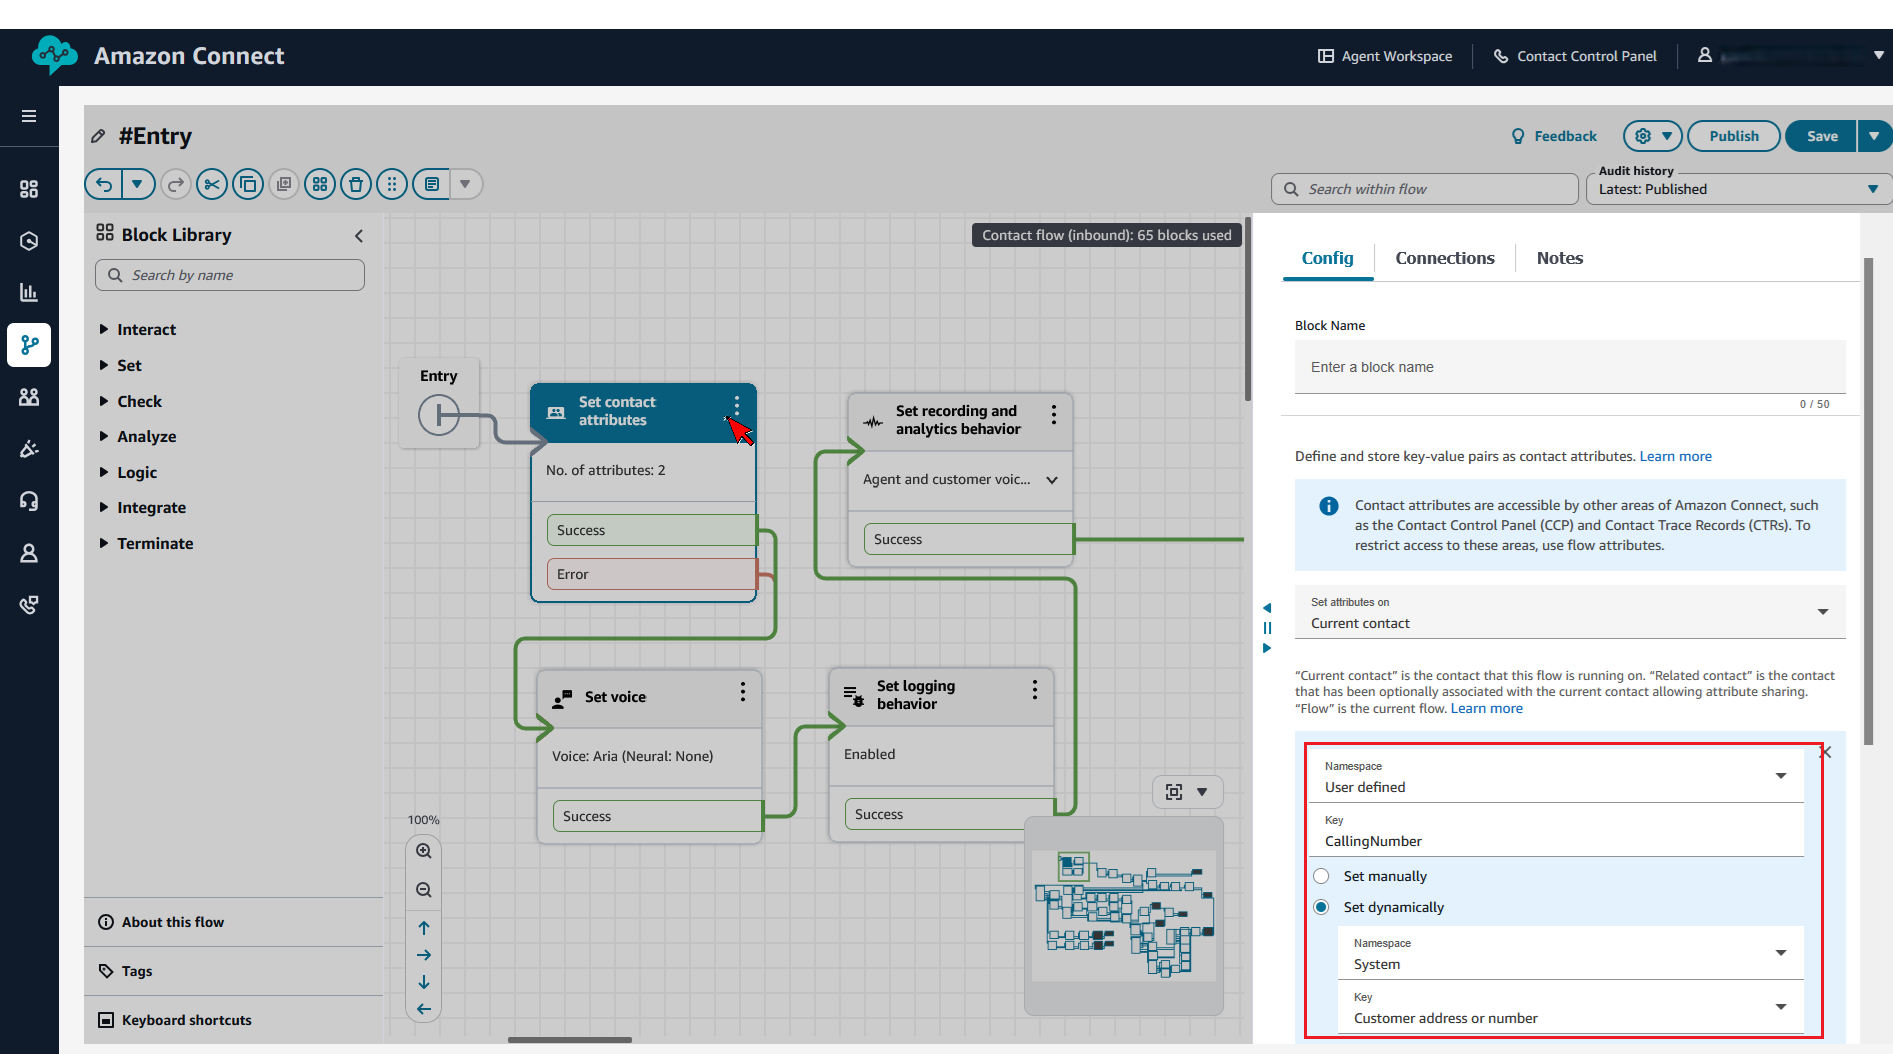
1. In all applicable Amazon Connect inbound, transfer and outbound flows, add a ‘Set Contact Attribute’ block, and set the following User Defined attributes
- CallingNumber – set this for the inbound and outbound voice (and chat if SMS) customer calling Id. The attribute name can vary, based on what is used for the agent configuration and the interaction lambda function used above.
- QueueName – set this for the queue before call is transferred to queue. The attribute name can vary, based on what is used for the agent configuration and the interaction lambda function used above.
The above two attributes are required. CallingNumber is tpyically set at the entry flow, and outbound flow. QueueName would be set prior to transfer to queue for applicable flows (inbound, transfer and outbound flows). If your organisation uses account numbers (or similar) for matching/identifying callers, then setting this attribute in all applicable flows is required, and the attribute key would match the key used in the above sections (Amplify AgentHubConfig and Lambda configuration). There is also two other available attributes that can be displayed to agents, e.g. booking reference and booking status - these would need to be set in applicable flows and match previous configuration.
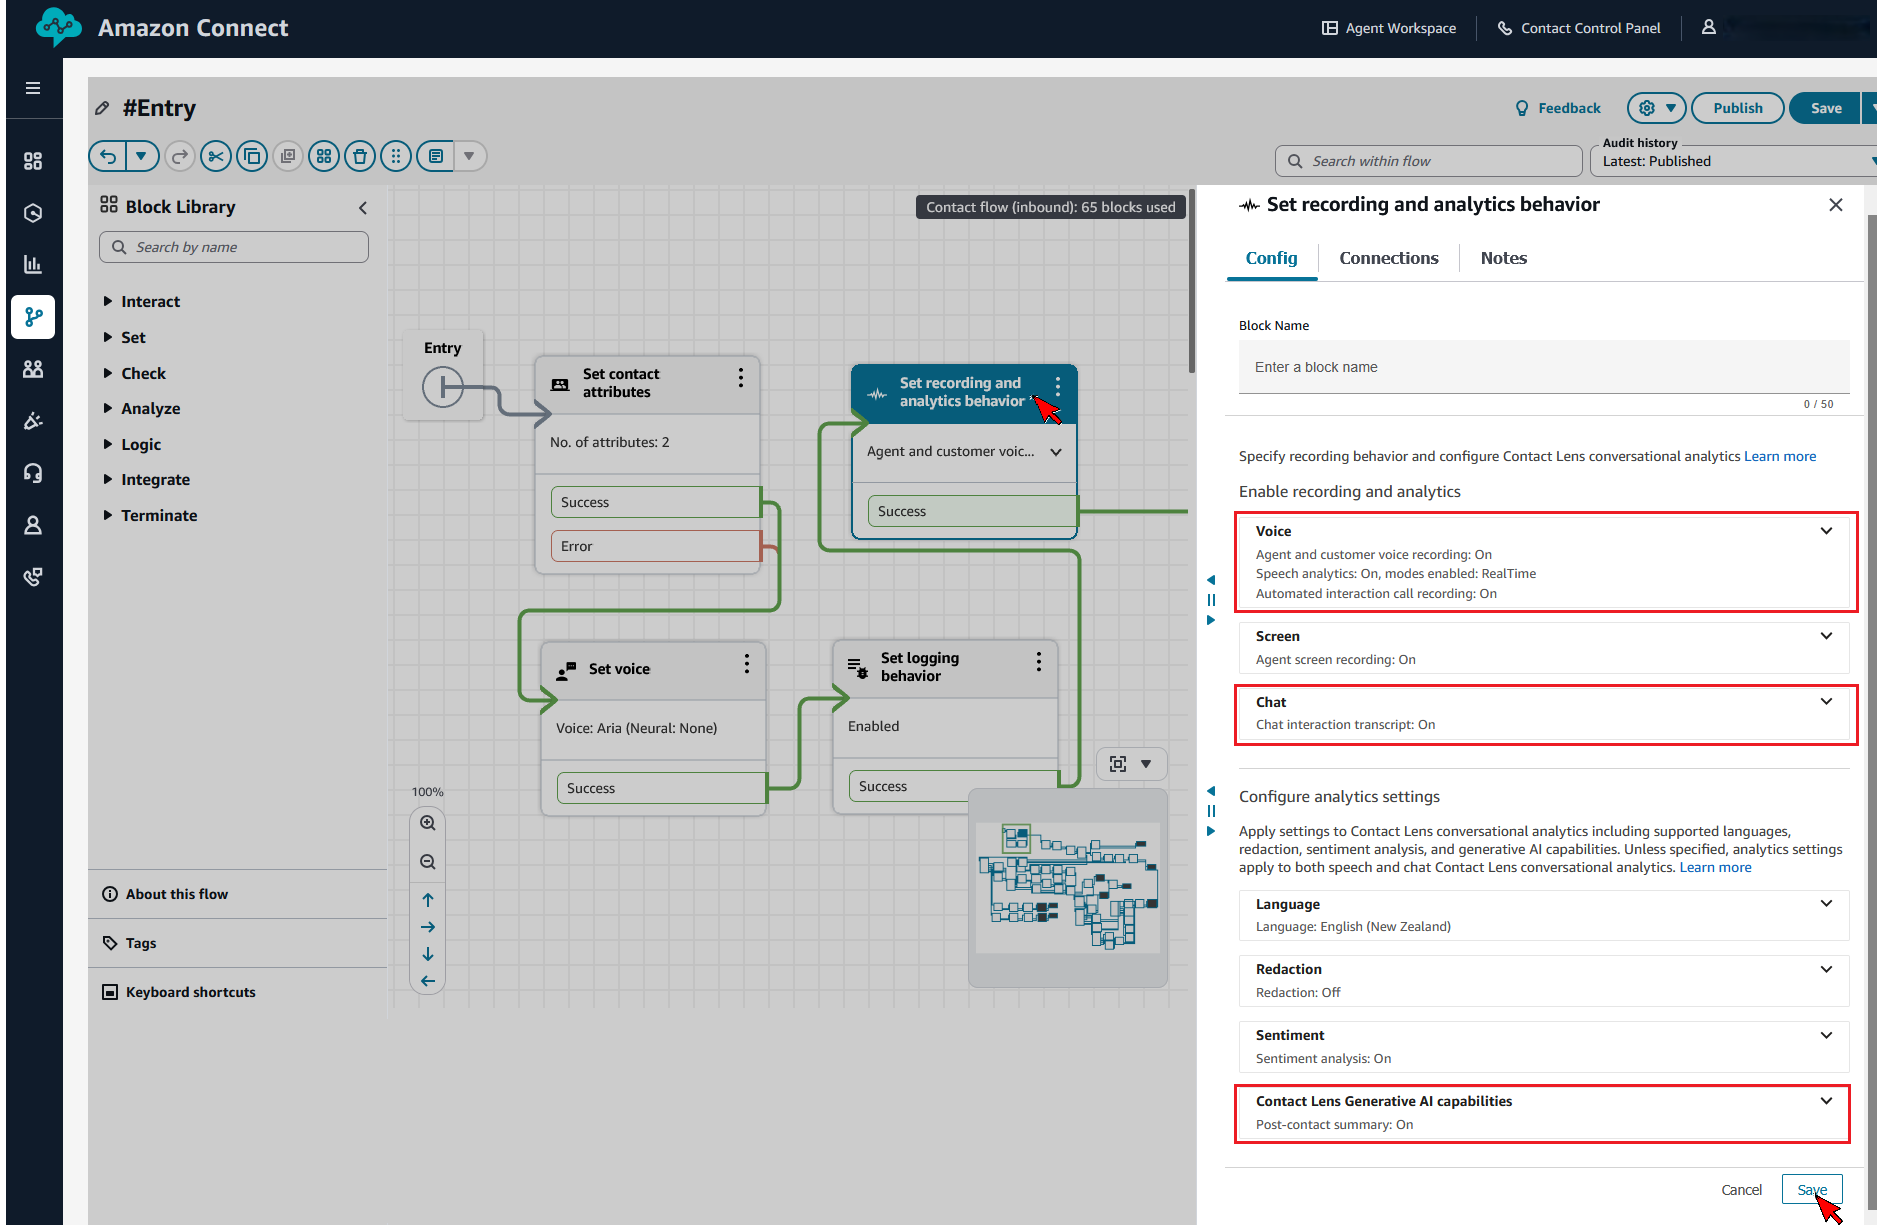
2. In all applicable Amazon Connect flows, where call Set Recording and Analytics block, ensure that
- Agent and Customer voice recording is enabled
- Contact Lens speech analytics (realtime and post-call) is enabled
- Chat analytics is enabled
- Post-contact summary is enabled
Security Profiles
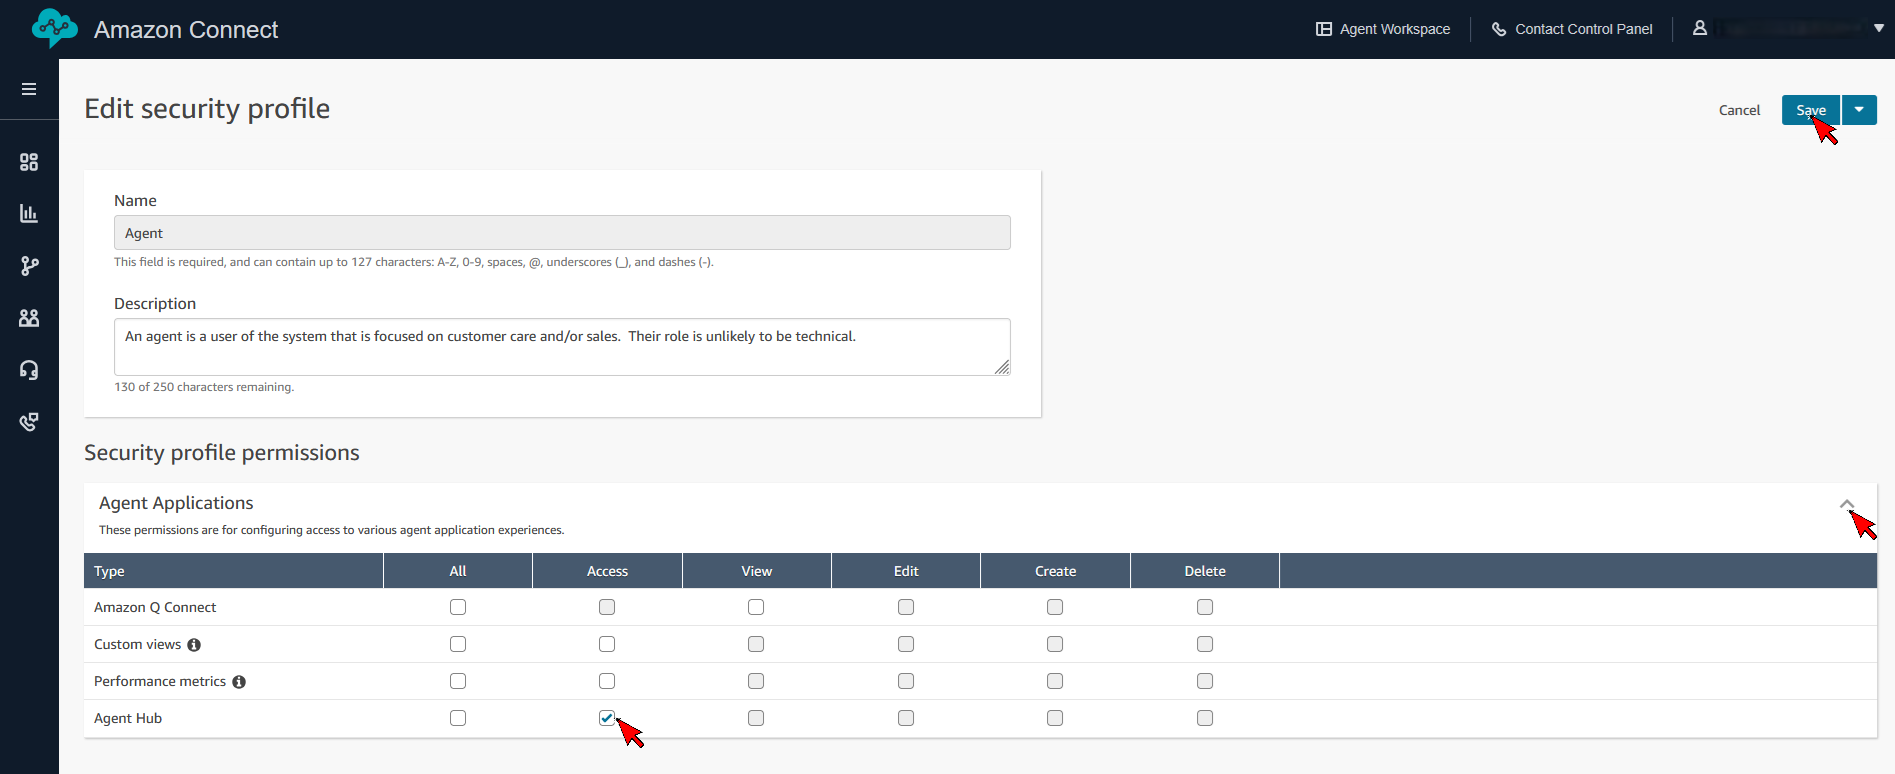
1. Select the applicable agent security profile(s)
i. Expand the ‘Agent Applications’ section
ii. Select the Access tick box for the Type/App “Agent Hub” (or as named above in Third Party Application)
iii. Click ‘Save’
Agent Desktop Setup
Once agent has launched Agent Workspace. From the right hand Apps drop-down button, select the app “Agent Hub” (or as named above in Third Party Application). This will add the app to their third party application list.
They should select the ellipse and pin app. This will prevent from closing on workspace refreshes.
If an agent clears cache, they will need to perform this step.
